Collision Lab

Objectives

  • Study the process of collision and impulse forces.
  • Verify that the change in momentum is the integral of the impulse force as a function of time, within experimental errors.

Physics Overview


Consider two objects: the first a small ball and the second a large much more massive object - say a building. The latter object is at rest and its mass is many orders of magnitude greater than the mass of the small ball. Suppose you throw the ball at the wall of the building (for the sake of argument: perfectly horizontally), everyday experience tells you that you will find the ball comes straight back to you, reversing its initial path. The second object; the massive building, remains perfectly stationary.
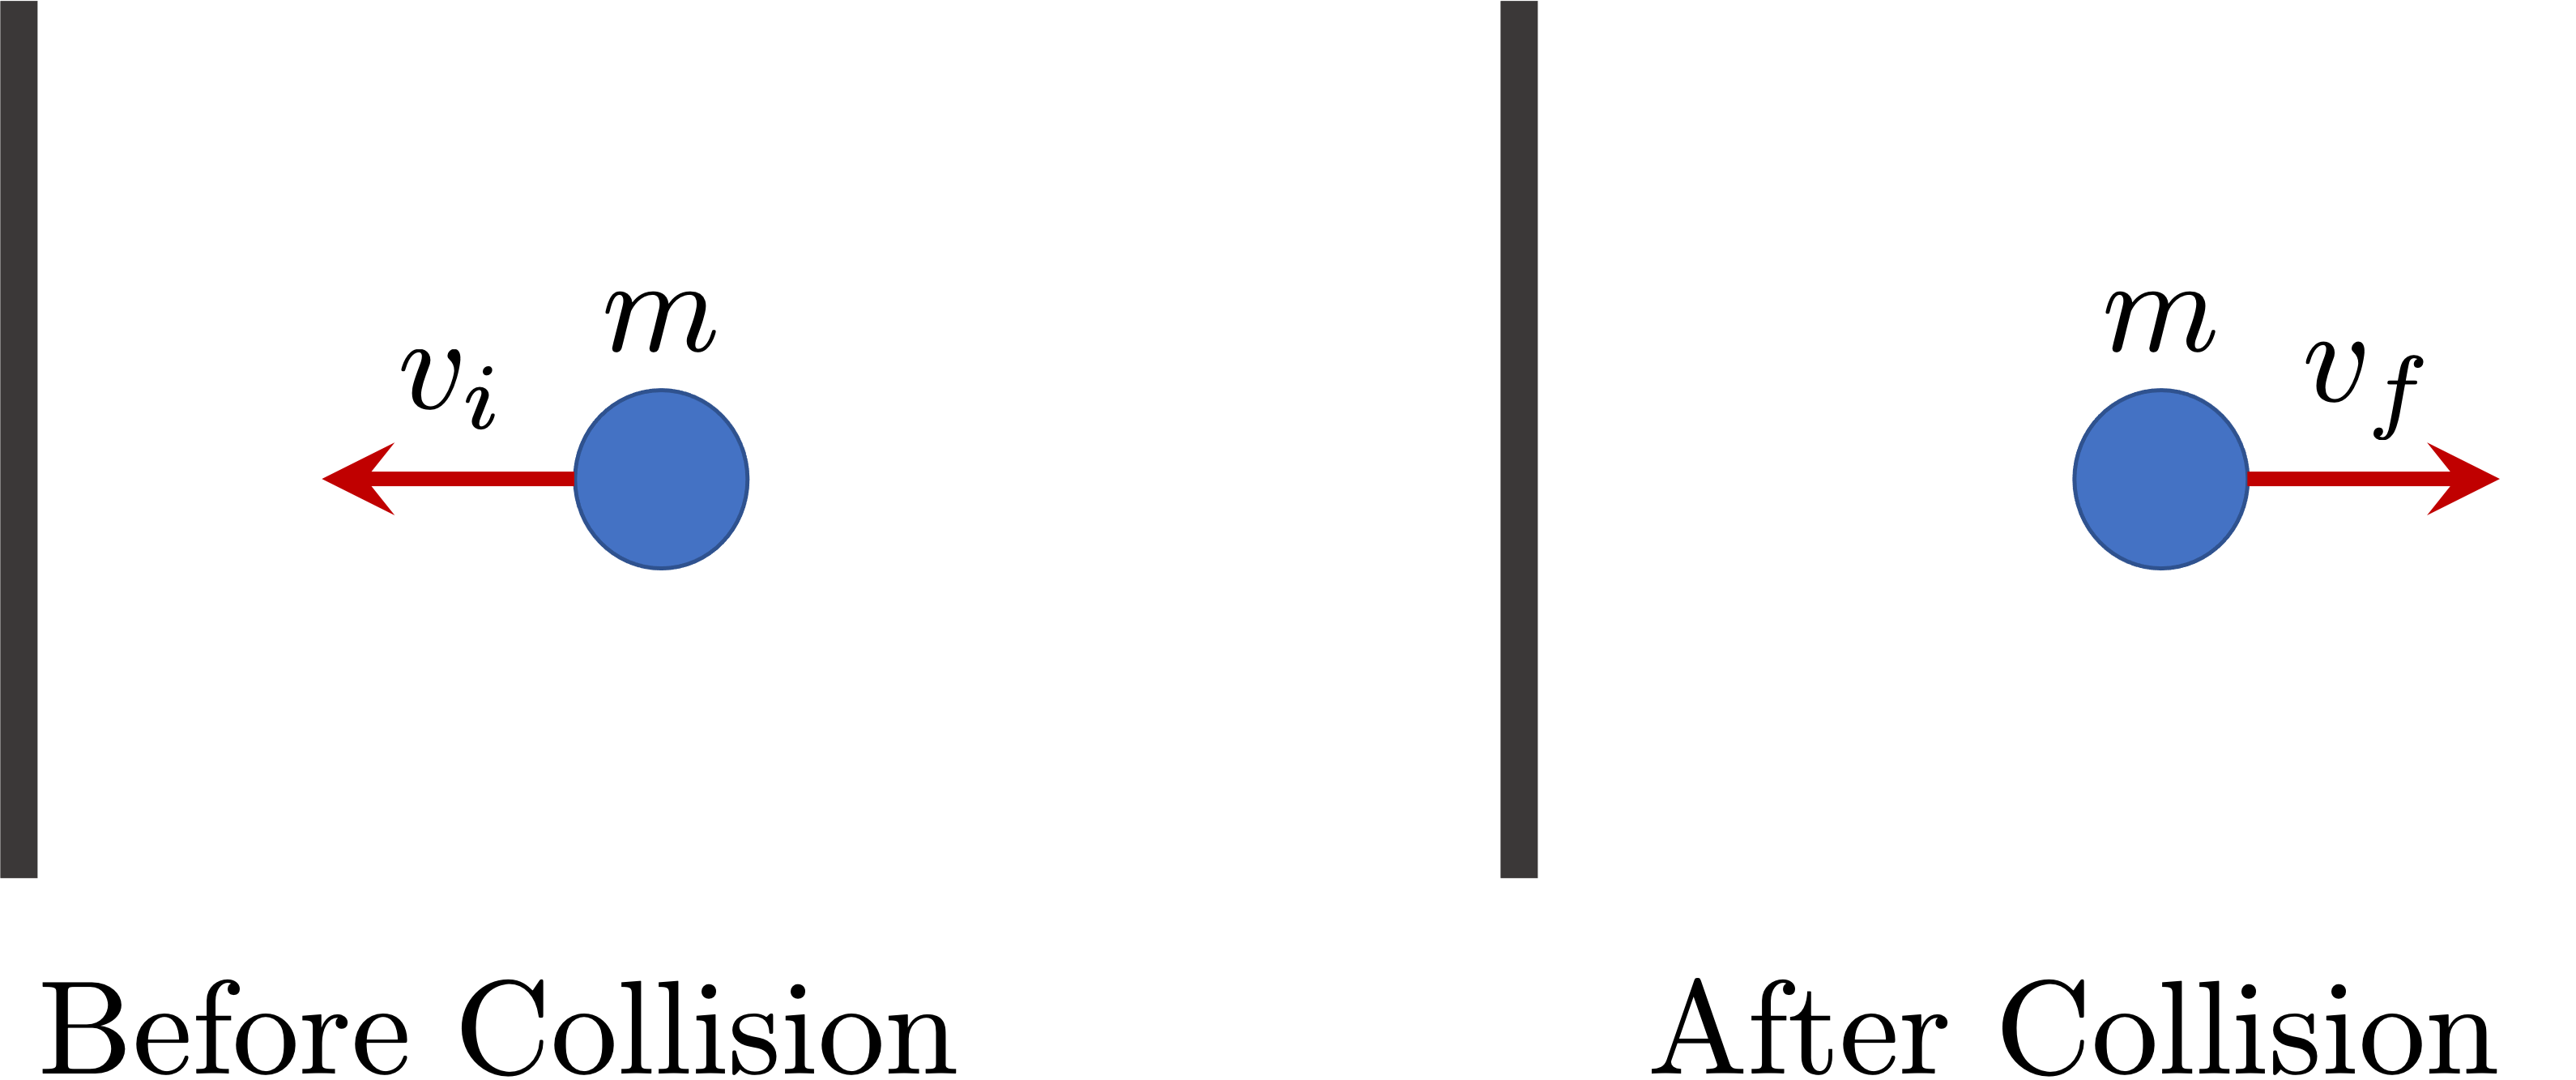

a collision between a ball and a wall

Fig. 1: A small ball of mass \(m\) collides with a stationary object - a wall. The ball reverses direction post-collision.

We can analyse the interaction between the two objects by studying the process of collision of the ball with (the wall of) the building. Consider the situation shown in Figure 1. The ball of mass \(m\), moves along a perfectly horizontal path and collides with an immobile wall with a horizontal velocity \(\vec{v}_i\). The process of collision between the two objects lasts on the order of a few miliseconds. Let us assume that during this short time interval, the interaction between the two objects is such that the incoming kinetic energy of the ball is converted to potential energy of deformation of the ball (mostly) and the wall. The objects deform momentarily and store potential energy in the deformation. This potential energy then gets converted to kinetic energy and by the end of the collision, the ball gains most of the kinetic energy, while the building continues in its state of rest. If the kinetic energy of the ball just before the collision is equal to the kinetic energy of the ball immediately after the collision, then the collision is a perfectly elastic collision. Such an idealised collision can be analysed by studying the kinetic energy and linear momentum of the system before and after the collision.


Let us first define the system as the ball and the wall of the building. We will ignore forces extraneous to the system, i.e., things like friction and gravity etc, simply don't exist in this idealization. Then, the process of collision is simply an interaction between two objects, and the forces that each object exerts on the other are completely internal to the system and form an action-reaction pair. Thus, the net force on the system is still zero, as these forces will sum to zero.


Therefore, we can examine the momentum of the system before and after collision. As can be seen in Figure 1, the only momentum that the system has prior to collision is by virtue of the ball; the momentum vector points to the left and has a magnitude \(mv_i\), as shown. Immediately after collision, the wall continues in its state of rest and the ball has a momentum pointing to the right, and let us assume that the speed of the ball is \(v_f\), hence the magnitude of the momentum is thus \(mv_f\). We can then write


\[ \vec{p}_i = -\vec{p}_f \implies m\vec{v}_i = -m\vec{v}_f. \label{eq:mom1} \]


This immediately yields,


\[ v_f~\hat{i} = -v_i~\hat{i}.\]


Which means that the velocity merely reverses direction, however the magnitude remains unaltered.


Examination of the kinetic energy is trivial and does not yield anything new as kinetic energy depends on the square of the speed, and the speeds of the ball are identical before and after the collision.


From the perspective of the small ball however, there is a net force on it. This net force is due to the wall exerting a force on the ball. This force has a time dependence and it begins as soon as the collision starts and ends when the collision ends. Thus there is an impulse force that is responsible for changing the momentum ball. We can essentially apply Newton's second law to write,


\[ \vec{F}_\textrm{im} = \frac{d\vec{\vec{p}}}{dt}, \label{eq:fim} \]


where \(F_\textrm{imp}\) is the impulse force that the wall exerts on the ball for the duration of the collision. Integrating Eq. \eqref{eq:fim} yields,


\[ \int_{t_{_i}}^{t_{_f}} \vec{F}_\textrm{im} dt = \vec{p_f} - \vec{p_i} \implies \Big|\int_{t_{_i}}^{t_{_f}} \vec{F}_\textrm{im} dt \Big| = |\vec{p_f} - \vec{p_i}| = 2mv_i, \label{eq:pchange} \]


where we have used Eq. \eqref{eq:mom1} in the last equality. This is what you will be confirming within experimental error in today's lab.


If you would like to get a quick video refresher about \(1-\)D elastic collisions see the following video.

Apparatus

For carrying out the experiment you will need the following equipment:

  • iOLab Device and corresponding USB Dongle.
  • A computer with iOLab data logging software installed.
  • iOLab accesory kit.
  • Phy 200 iOLab kit.
  • An object that has a hard flat surface; e.g., a cellphone or a hardbound textbook.

Give it a go!

give it a go

Procedure

The lab that you will be doing today consists of two parts; Part I and Part II. The procedures for these two parts are given below.


Part - I (Determine the mass of the iOLab Device):


The video below shows how to attach the small spring from the iOLab kit to the force sensor.


The video below shows how to do the experiment for determining the mass of the iOLab device. Note that the small spring is attached to the force sensor.


This is the procedure to be followed for determining the mass of the iOLab device with the small spring attached:


  1. First attach the small spring from the iOLab kit to the force sensor as shown in the video above.
  2. Turn on the device and and open the data collection software on your computer after plugging in the USB dongle. On the software select the accelerometer and the force sensor.
  3. Place the iOLab device on the table, with the \(y-\)axis pointing downwards (see video above). Press record on the data collection software.
  4. After a few seconds lift the device up by holding the screw. Keep the device lifted for about \(10~\)s.
  5. Place the device back on the table and stop recording the data after a few seconds.

In the data analysis section you will learn how to analyse the data you have collected to determine the mass of the iOLab device with the small spring attached.


Part - II (The experiment for the lab):


The video below shows you what you will be doing in the lab today. Take care not to make the small spring buckle during the collision shown - in other words do not push the device too hard.


This is the procedure to be followed for doing the experiment for the Collision Lab:


  1. First attach the small spring from the iOLab kit to the force sensor as shown in the video above.
  2. Place a flat surface next to the small spring as shown in the video above. It could be a hardbound textbook or your phone or ipod, etc.
  3. Turn on the device and and open the data collection software on your computer after plugging in the USB dongle. On the software select the wheel velocity sensor and the force sensor.
  4. Place the iOLab device on the table, with the wheels down and the small spring facing the hard surface (see video above). Press record on the data collection software.
  5. After a few seconds gently push the iOLab device towards the hard surface to make it collide with it.
  6. Allow the iOLab device to come to a full stop after collision and stop recording the data.

You should now have all the data you need to start analysing the data which is outlined in the following section.


Data Analysis


Detemining the mass of the device


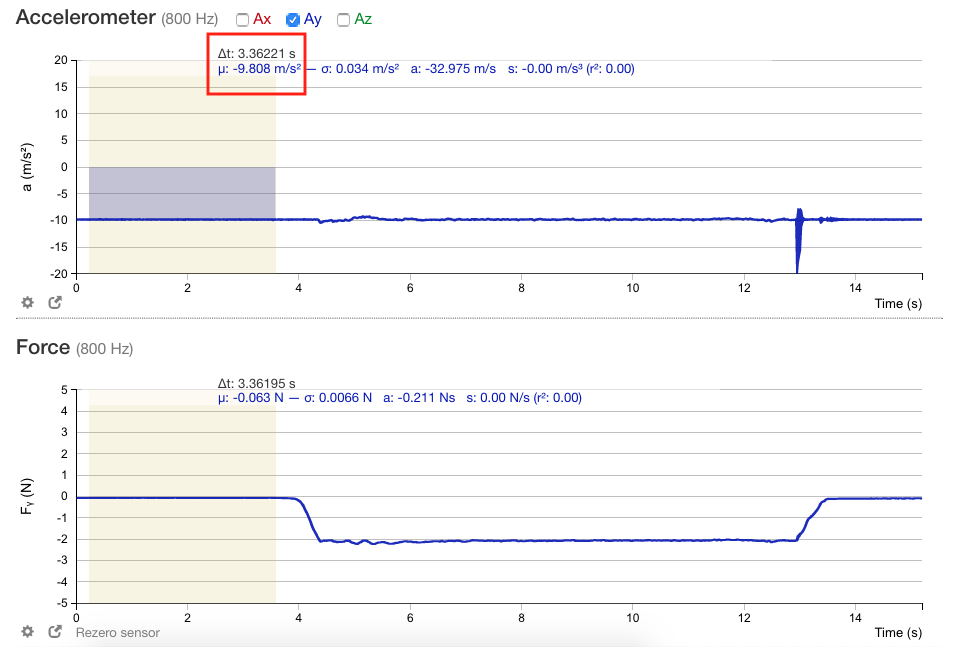
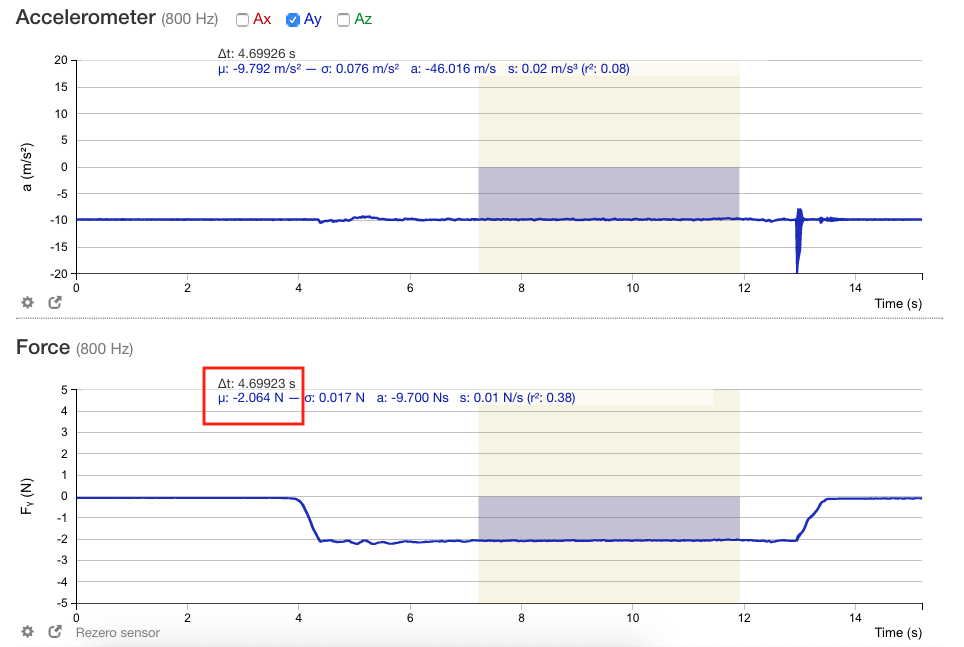
In the iOLab software open up the data you have collected in Part I for determining the mass of the iOLab device. First, determine the average value of the acceleration due to gravity when the device was resting on the table (see Figure 2 below). Carefully note down this average value of the acceleration. Next, determine the average value recorded by the force sensor when you lifted up the device; avoid the end regions of the interval, find the average somewhere in the middle of this region (see Figure 3 below). Carefully note down this average value of the force.. Divide the average force by the average acceleration to get the mass of the device. Carefully note down the value of the mass of the device you have determined.


average value of acceleration for mass determination

Fig. 2: Find the average value of the acceleration when the iOLab was resting on the table as indicated in the red box in the figure.

average value of force for mass determination

Fig. 3: Find the average value of the force when the iOLab was lifted up as indicated in the red box in the figure.

Determining the impulse


In this part of the data analysis we will be looking at the data you have collected from the force sensor and the wheel sensor for the wheel velocity, as functions of time. The video below shows you how to analyse the data to determine the impulse.


Carefully note down the area under the force vs time plot, being careful to select the data that represents duration of the collision, as accurately as you can. Note down the initial and final velocities of the device, before and after collision, take note of the signs! Multiply the change in velocity by the mass of the device as determined above and you should get the net change in momentum of the device. Compare this value with the area under the force curve. How do the two compare?


Report Considerations

Make sure you include the following in your lab report:

  • A snapshot showing the plot of Force vs time, clearly showing the area under the force curve.
  • Two snapshots showing the average values of the velocity of the iOLab device before and after collision. Refer to the video above.
  • Two (2) snapshots showing your determination of the mass of the device (similar to Figures 2 and 3 above).
Questions to answer in the discussion section.
  • Is this collision purely elastic? Why or Why not?
  • What do you think are the dissipative forces at work, if any?
  • Describe the errors in your measurements.